Setting up a VPN Server
Setting up your own VPN server on Cloud
VPN services are pretty popular these days. As days pass, more and more people are starting to use VPN services. There are a lot of benefits for using VPNs, some of them being:
- Protection from snooping on public networks (like public WiFi hostspots etc.)
- Bypass geographic restrictions on websites.
- Access blocked websites and services.
- Hide your internet activity from your ISP.
- Avoid network throttling (in some cases) and so much more….
There are a lot of free VPNs available that people can use, but most of them, being free, throttle your download speeds. Paid VPNs are much better and much more trusted than the free ones, but require you to buy monthly/yearly plans. Although it is recommended to use a paid VPN service, it never hurts to have your own VPN server you can use at any time. In this post, we’ll be looking at how to setup our own VPN on an AWS EC2 instance.
For setting up our own VPN, we’ll be using OpenVPN, which is an open-source commercial software that implements virtual private network (VPN) techniques to create secure point-to-point or site-to-site connections in routed or bridged configurations and remote access facilities. It uses a custom security protocol that utilizes SSL/TLS for key exchange.
OpenVPN is a full-featured SSL VPN which implements OSI layer 2 or 3 secure network extension using the industry standard SSL/TLS protocol, supports flexible client authentication methods based on certificates, smart cards, and/or username/password credentials, and allows user or group-specific access control policies using firewall rules applied to the VPN virtual interface.
Since OpenVPN is a SSL based VPN, we’ll need TLS certificates for encrypted communication between your clients and server. We’ll need a Certificate Authority to issue these certificates. We’ll also need to create certs for all clients and our VPN server itself. So to achieve this, we would also be using EasyRSA along with OpenVPN, which is suggested by OpenVPN for generating our Public Key Infrastructure (PKI) and Server/Client certificates and keypairs.
easy-rsa is a CLI utility to build and manage a PKI CA. In laymen’s terms, this means to create a root certificate authority, and request and sign certificates, including intermediate CAs and certificate revocation lists (CRL). We see that EasyRSA 3.x wasnt available on ubuntu packages, so we manually download and install easy-rsa from the repo.
Tip
Keep your CA on a different server than you VPN server.
The heart of a PKI is the CA, or Certificate Authority, and this is also the most security-sensitive. The CA private key is used to sign all issued certificates, so its security is critical in keeping the entire PKI safe. For this reason, it is highly recommended that the CA PKI structure be kept on a system dedicated for such secure usage.
# run this as root

apt update
apt install openvpn
wget https://github.com/OpenVPN/easy-rsa/releases/download/v3.0.6/EasyRSA-unix-v3.0.6.tgz
tar -xf EasyRSA-unix-v3.0.6.tgz /etc/
rm EasyRSA-unix-v3.0.6.tgz
You can create var file (template vars.example) in case you want to change some setting related to easyrsa (eg. Name , organisation, encryption algorithm. keysize etc.). Once done, we can initialize our Public Key Infrastructure and create CA certificate and key. This will be used between our clients and server as a source of trust.
root@ca:/etc/EasyRSA-v3.0.6# ./easyrsa init-pki
Note: using Easy-RSA configuration from: ./vars
init-pki complete; you may now create a CA or requests.
Your newly created PKI dir is: /etc/EasyRSA-v3.0.6/pki

root@ca:/etc/EasyRSA-v3.0.6# ./easyrsa build-ca nopass
. . . .
Common Name (eg: your user, host, or server name) [Easy-RSA CA]: ca.internal.devopsdiary.tech

CA creation complete and you may now import and sign cert requests.
Your new CA certificate file for publishing is at:
/etc/EasyRSA-v3.0.6/pki/ca.crt
Similarly, install easyrsa on your vpn server and generate PKI on your server. We do this again in our vpn server because ideally you should never generate entity keypairs for a client or server in a PKI you are using for your CA. It is best to separate this process and generate keypairs only on the systems you plan to use them. Once PKI is setup, we then create a keypair and certificate request for the server, which is to be signed by our CA. Once the server request and key is generated, move your server key to the openvpn directory(or make changes in the server.conf in openvpn folder to point to the correct server key). Also copy your server request to your CA server to sign it.
root@vpn:/etc/EasyRSA-v3.0.6# ./easyrsa init-pki
Note: using Easy-RSA configuration from: ./vars
init-pki complete; you may now create a CA or requests.
Your newly created PKI dir is: /etc/EasyRSA-v3.0.6/pki

root@vpn:/etc/EasyRSA-v3.0.6# ./easyrsa gen-req server nopass
. . . .
Keypair and certificate request completed. Your files are:
req: /etc/EasyRSA-v3.0.6/pki/reqs/server.req
key: /etc/EasyRSA-v3.0.6/pki/private/server.key

root@vpn:/etc/EasyRSA-v3.0.6# mv pki/private/server.key /etc/openvpn/root@ca:/etc/EasyRSA-v3.0.6# ./easyrsa import-req /tmp/server.req server
Note: using Easy-RSA configuration from: ./vars
Using SSL: openssl OpenSSL 1.1.1 11 Sep 2018
The request has been successfully imported with a short name of: server
You may now use this name to perform signing operations on this request.
root@ca:/etc/EasyRSA-v3.0.6# ./easyrsa sign-req server server
You are about to sign the following certificate.
Please check over the details shown below for accuracy. Note that this request
has not been cryptographically verified. Please be sure it came from a trusted
source or that you have verified the request checksum with the sender.
Request subject, to be signed as a server certificate for 1080 days:
subject=
commonName = server
Type the word 'yes' to continue, or any other input to abort.
Confirm request details: yes
. . . .
Write out database with 1 new entries
Data Base Updated
Certificate created at: /etc/EasyRSA-v3.0.6/pki/issued/server.crtOnce done, copy the server.crt and ca.crt to your vpn server. Once done, we can further harden the security of our server by adding tls-auth. We also need to create a Diffie-Hellman key which will be used during the key exchange process. Once done, copy the ta.key and dh.pem to your openvpn folder. Now we have all the certs and keys required for your VPN server.
The tls-auth directive adds an additional HMAC signature to all SSL/TLS handshake packets for integrity verification. Any UDP packet not bearing the correct HMAC signature can be dropped without further processing. The tls-auth HMAC signature provides an additional level of security above and beyond that provided by SSL/TLS.
root@vpn# cd /etc/EasyRSA-v3.0.6
root@vpn:/etc/EasyRSA-v3.0.6# ./easyrsa gen-dh
root@vpn:/etc/EasyRSA-v3.0.6# openvpn --genkey --secret ta.key
root@vpn:/etc/EasyRSA-v3.0.6# cp ta.key /etc/openvpn/
root@vpn:/etc/EasyRSA-v3.0.6# cp pki/dh.pem /etc/openvpn/
We’ll now look at the client requests. This follows similar steps to what we have already performed. We need to create a client certificate and keypair and have it signed by our CA. Ideally this should be done by your vpn server instead of the client machine, as you can automate the entire joining process and make the experience much smoother and easier.
#on vpn server
root@vpn:/etc/EasyRSA-v3.0.6# ./easyrsa gen-req home-pc nopass
root@vpn:/etc/EasyRSA-v3.0.6# mkdir -p client-configs/keys
root@vpn:/etc/EasyRSA-v3.0.6# cp /etc/openvpn/{ta.key,ca.crt} client-configs/keys/
root@vpn:/etc/EasyRSA-v3.0.6# mv pki/private/home-pc.key client-configs/keys/
root@vpn:/etc/EasyRSA-v3.0.6# scp pki/issued/home-pc.crt user@ca.internal.devopsdiary.tech:/tmp/

#on ca server
root@ca:/etc/EasyRSA-v3.0.6# ./easyrsa import-req /tmp/home-pc.req home-pc
root@ca:/etc/EasyRSA-v3.0.6# ./easyrsa sign-req client home-pc
root@ca:/etc/EasyRSA-v3.0.6# scp pki/issued/home-pc.crt user@vpn.internal.devopsdiary.tech:/tmp/

#back on vpn server
root@vpn# mv /tmp/home-pc.crt /etc/EasyRSA-v3.0.6/client-configs/keys/
Once this is done, we now focus on setting up client and server configurations. A sample configuration is provided by openvpn for our reference and is located at /usr/share/doc/openvpn/examples/sample-config-files. We copy the sample server configuration to /etc/openvpn/server.conf and make our changes in this file. Most of the default params should work, but you might need to make some changes to some configs or uncomment certain properties. Here are the relevant changes we need to make:
# server.conf

port 1194
proto udp

ca ca.crt
cert server.crt
dh dh.pem
cipher AES-256-CBC

max-clients 5
user nobody
group nogroup

status /var/log/openvpn/openvpn-status.log
log         /var/log/openvpn/openvpn.log
log-append  /var/log/openvpn/openvpn.log
In order to force all our traffic through the VPN tunnel, we need to uncomment the redirect-gateway setting. We can also use the DNS servers provided by opendns.com by uncommenting the dhcp-option setting.
push "redirect-gateway def1 bypass-dhcp"
push "dhcp-option DNS 208.67.222.222"
push "dhcp-option DNS 208.67.220.220"
The server will need to be configured to deal with this traffic somehow, and we will be doing it by NATing it to the internet. Here -s is the subnet used for VPN as defined in server configuration.
$ ip route | grep default
default via 172.31.0.1 dev ens5 proto dhcp src 172.31.13.135 metric 100

$ sudo iptables -t nat -A POSTROUTING -s 10.8.0.0/24 -o ens5 -j MASQUERADE
This should do it for the server side configuration, now lets focus on client configs. Just like our server conf, we also have a sample client configuration that we can use. Below are the important settings that we need to set within out client configuration. You can change the name of cert/keys if you changed their names. Once done, save this file as home-pc.ovpn (or <client-name>.ovpn).
client
dev tun
proto udp

remote <vpn-server-ip> 1194
user nobody
group nogroup

ca ca.crt
cert home-pc.crt
key home-pc.key
remote-cert-tls server

tls-auth ta.key 1
cipher AES-256-CBC

key-direction 1
This concludes the setup of our very own VPN. We can finally test if our VPN works now or not. To use our VPN on client machine, we need to ship these files to the client machine. Create a folder called home-pc (client-name) and add the following files to the folder:
- ca.crt
- ta.key
- home-pc.crt
- home-pc.key
- home-pc.ovpn
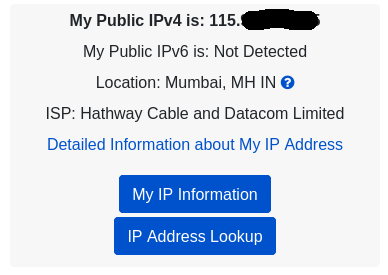
Zip this folder and get this folder to you client machine. Check you current IP.
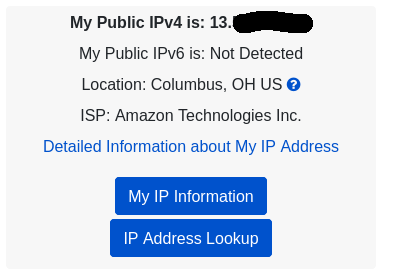
Unzip the file on your client,and now you can finally use your VPN using the following command:
sudo openvpn home-pc.ovpn
If everything works properly, you should see that you IP has changed.
This concludes the setup of our very own VPN server!
References:
Share this post
Twitter
Facebook
Reddit
LinkedIn
Email