All about DHCP Servers
Understanding DHCP and setting up your own DHCP server
On a network with a large number of clients, DHCP is a must for dynamically assigning IP addresses to all the connected clients in order to avoid address conflicts and automating other required configurations like subnet mask, default gateway, DNS servers etc. Nowadays, almost all of the routers, even the smaller home routers already have an inbuilt DHCP server within the router that assigns IP addresses to connected clients. Still, why not learn how to set up one for yourself?
So, what is DHCP?
The Dynamic Host Configuration Protocol (DHCP) is a network management protocol used on Internet Protocol networks whereby a DHCP server dynamically assigns an IP address and other network configuration parameters to each device on a network so they can communicate with other IP networks.
Another thing to note is that DHCP does not permanently give out IP addresses to clients, but it leases these IP addresses. The clients need to periodically renew these leases so as to keep the IP addresses. DHCP servers do this so as not to run out of IP addresses.
Even though IP addresses are randomly assigned to clients by the DHCP server from the address pool of DHCP server (the address pool is basically all the IP addresses that the DHCP server can hand out to clients), but it is possible to get the same IP address for a client everytime it connects to the network by making a DHCP reservation. This is done by mapping the MAC address of the client with the desired IP address.
How does DHCP work?
- Whenever a device connects to a network, the client sends a DHCP broadcast query requesting the necessary information. This process is called “DHCP Discover”. Any DHCP server present on the network may service the request (There can be multiple DHCP servers).
- When a DHCP server recieves this request, it also broadcasts a “DHCP Offer” message (as an IP hasnt been allotted to client yet) informing the client that its available. This offer message contains relevant network information like the DNS servers, subnet mask, default gateway, server id etc. It also offers an available IP from its address pool in the response.
- Once the client recieves this offer message, it responds with a “DHCP request” message, which it also broadcasts to the network. In case there are multiple DHCP servers in the network, the client will recieve multiple DHCP offers. The client replies to only one of these messages by setting the server id field in the DHCP request. All the other offers are automatically declined. The client again broadcasts the DCHP request over the network as it still hasn’t been allotted the IP address.
- The DHCP server(s) recieve this message and check wether the message was intended for them (by checking for the server identifier). The matching server then broadcasts a “DHCP Ack”. The server transfers all configuration data again to the client. The client uses these configurations to configure their network interface and finally connect to internet.
The client can use that particular IP address only until the lease expires. In order to keep using the same address, it needs to renew the lease. For the renewal process, client makes a DHCP request to the DHCP server with its IP address. The DHCP server sends a DHCP ack, confirming the extension on the lease. The communication this time is done via unicast and not broadcast, as both parties know each other’s IP addresses. When the client is done using the IP, it can release the IP by sending a DHCP release message.
There is a brilliant in-depth article on the DCHP procedure at netmaniacs here. The graphics used here are from this article.

Setting up you own DHCP Server
Now that we understand how a DHCP Server works, we’ll get our hands dirty and create a server of ur own. We’ll set up our DHCP on an Ubuntu server (18.04). We will be using ISC DHCP, which offers a complete open source solution for implementing DHCP servers. Install the required packages by running the following commands.
$ sudo apt update
$ sudo apt install -y isc-dhcp-server
Once installation is complete, we’ll make changes in the DHCP configuration file located at /etc/dhcp/dhcpd.conf.
First, we’ll set the global configuration parameters for the DHCP server.
This includes your domain name, name-servers, lease timings etc. In case this is the only DHCP server in your network or you want to make it the main DHCP server, also uncomment the “authoritative” parameter.
In case there are multiple interfaces, we also need to configure the interface where the DHCP daemon will serve the requests. This can be done by setting up the INTERFACESv4 parameter (for IPv4, can also use INTERFACES instead) with the related interface. The list of all available interfaces can be found by running ip a.
# /etc/dhcp/dhcpd.conf

option domain-name "devopsdiary.tech";
option domain-name-servers ns-432.awsdns-54.com, ns-719.awsdns-25.net;
default-lease-time 3600;
max-lease-time 7200;
authoritative;
INTERFACESv4="enp0s3"
Once done, we’ll now define our subnet. We can do that by adding a subnet block in the configuration. Inside this block, we’ll define the other key parameters that are required, like the address pool, the default-gateway, subnet mask and the dns servers to use. As an example, we setup DHCP for 192.168.10.0/24 subnet.
subnet 192.168.0.0 netmask 255.255.255.0 {
  range 192.168.0.40 192.168.0.150;
  option routers 192.168.0.1;
  option subnet-mask 255.255.255.0;
  option domain-name-servers 8.8.8.8, 8.8.4.4;
}
You can also set other options like search domain, domain name servers etc. in the subnet block, else it defaults to the global parameters. Once done, save the file and restart your DHCP server service. Our DHCP server is now up and running.
$ sudo service isc-dhcp-server restartTesting our DHCP Server
Let’s confirm if our server works as expected. We’ll test this on another client machine. In our client machine, we need to make sure that we set our IPv4 Method set as Automatic (DHCP), so that the client doesn’t have a static IP address set by the user, but is set by our DHCP server. In this case, I’m using Ubuntu Server 18.04, which uses netplan for managing networking. We create a new configuration for our network interface configuration to use DHCP by setting dhcp4 = true in /etc/netplan/01-network-config.yaml. We can have multiple such configuration files with different configs, and netplan will apply these configs numerically. The final configuration looks something like this.
# /etc/netplan/01-network-config.yaml

network:
    ethernets:
        enp0s3:
            dhcp4: true
    version: 2
We can apply the config using the following command:
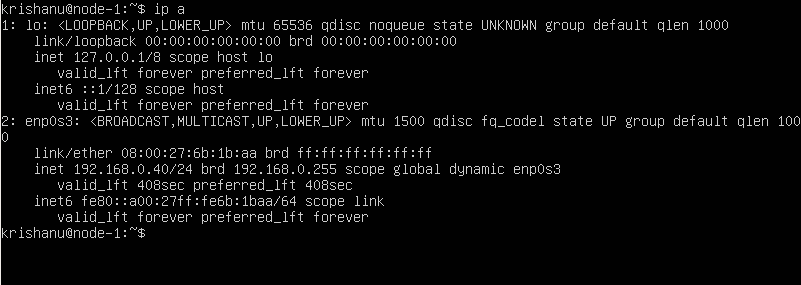
$ sudo netplan applyNow our client machine already had an IP address assigned to it by our router before we setup our DHCP Server, so, we’ll restart our client and check if our servers worked. And sure enough, we have a new IP address from the address pool from our DHCP Server.
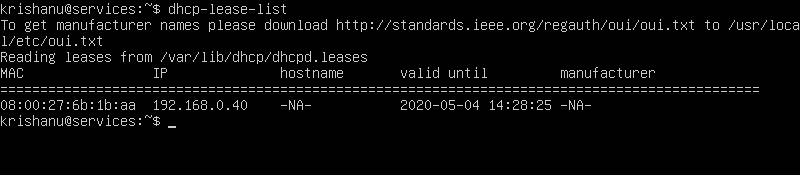
Just to cross-check, we can list all the IP addresses that have been handed out by our DHCP Server. We can do this by running dhcp-lease-list to display our leases and their validity.
This wraps up this article on DHCP Server!
Thanks for reading!
Share this post
Twitter
Facebook
Reddit
LinkedIn
Email